The experimental technique relies upon the very small range of angles over which a perfect crystal reflects X-rays. For the most commonly used cut of silicon crystal, this angular range is approximately 3 micro radians. To put it another way, this is the same angle subtended by an object 3mm high when seen from a kilometre away! Put more technically, the analyser reflectivity varies strongly with angle. It is close to unity at the Bragg angle qB and has a rocking curve width, DqD, of ~3mRadians. The analyser therefore functions as an extremely narrow slit. If the analyser angle is set half way down the rocking curve (qB±DqD/2), then its reflectivity is 0.5 for X-rays that transit the object undeviated. Rays that are deviated in the object through small angles will be reflected with either a greater or lower efficiency depending on the angle of incidence relative to the rocking curve. The steep slope of the rocking curve acts as a contrast amplifier and the technique is sensitive enough to reveal X-ray refraction effects which carry different information to conventional absorption contrast images. The series of diagrams and images in the table below explain this in a pictorial way. The images are of a simple plastic (pmma) rod with a diameter of 4mm seen from the side. | Low angle image | Peak Reflectivity | High angle image | 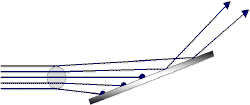 | 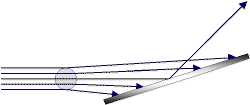 | 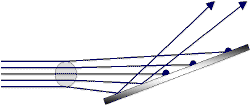 | Here the analyzer is set at the low angle 50% reflectivity point of the rocking curve for those rays that pass through the object undeviated. Any rays that are deviated by the object to an angle which is closer to the peak reflecting angle will be reflected with greater than 50% efficiency. The image below shows this for the rays refracted from the top of the plastic rod as illustrated in the diagram above. Conversely any rays that are deviated by the object to an angle which is further away from the peak reflecting angle will be reflected with less efficiency. This what is happening at the bottom of the plastic rod in the image below. | Here the analyzer is set at the peak of the rocking curve for those rays that pass through the object undeviated and reflects the X-rays with close to 100% efficiency. | Here the analyzer is set at the high angle 50% reflectivity point of the rocking curve for those rays that pass through the object undeviated. This is a similar situation to that illustrated in the first column of this table except that the analyzer is set to the opposite side of the rocking curve. In this case the gradient of reflectivity with angle is the reverse of the first column and so now the top of the plastic rod is deviating rays further away from the peak reflecting angle and so it appears dark in the image. Ray from the bottom of the rod are deviated to an angle which is closer to the peak reflecting angle and so it appears bright. | 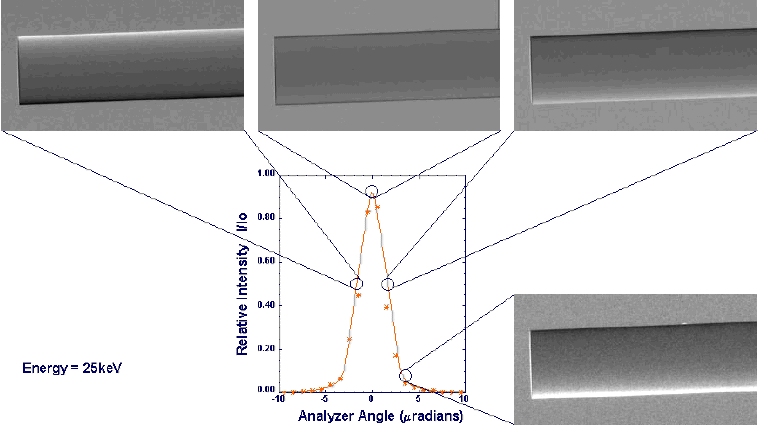 | | | The graph above shows the variation of reflectivity with angle. This graph is known as the rocking curve | The image above was recorded with the analyzer set to about 5% reflectivity. The contrast enhancing effect of the crystal is very strong here but fewer X-rays get to the detector resulting in a grainy image |
Separating Absorption from RefractionIt is possible to separate the absorption from the refractive effects by effectively adding or subtracting the high and low angle images. The full formulation can be found in Chapman and Thomlinson et al[i] 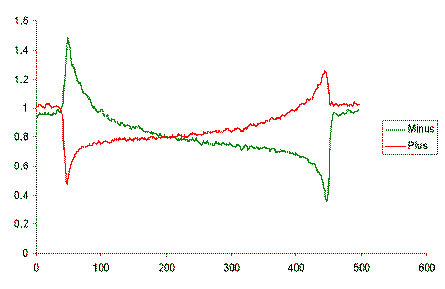 Vertical sections through the low (green) and high (red) angle plastic rod images shown above. The size of the edge effects in both images differ due to technical difficulties of position the analyzer crystal precisely at the 50% reflectivity points Vertical sections through the low (green) and high (red) angle plastic rod images shown above. The size of the edge effects in both images differ due to technical difficulties of position the analyzer crystal precisely at the 50% reflectivity points |
That this is correct can be seen intuitively from the graph on the left. This shows vertical sections taken through the high and low angle plastic rod images. It can be seen that by adding these together, the edge effects cancel out and one is left with just the arc representing the absorption effects . We call this the apparent absorption image (see below) The subtraction of the images removes the arc of the absorption but adds the opposite signed edge effects resulting in an apparent refraction image (see below) 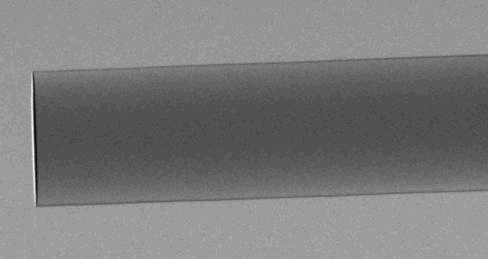 | 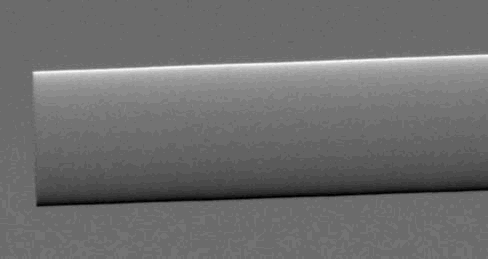 | Apparent absorption image | Apparent refraction image |
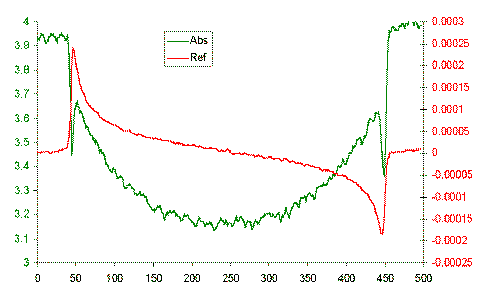 The apparent absorption and apparent refraction images are shown above. On the left the graph shows vertical sections through these images which illustrate the separation into refraction and absorption effects. Vertical sections through the apparent absorption (green) and apparent refraction (red) angle plastic rod images shown above. The edge effects visible in the apparent absorption image are probably residual phase contrast effects.
[i] D. Chapman, W. Thomlinson, R.E. Johnston, D. Washburn, E. Pisano, N. Gmür, Z. Zhong, R. Menk, F. Arfelli, D. Sayers, Diffraction enhanced x-ray imaging. Phys. Med. Biol. 42 (1997) 2015-2025 |